
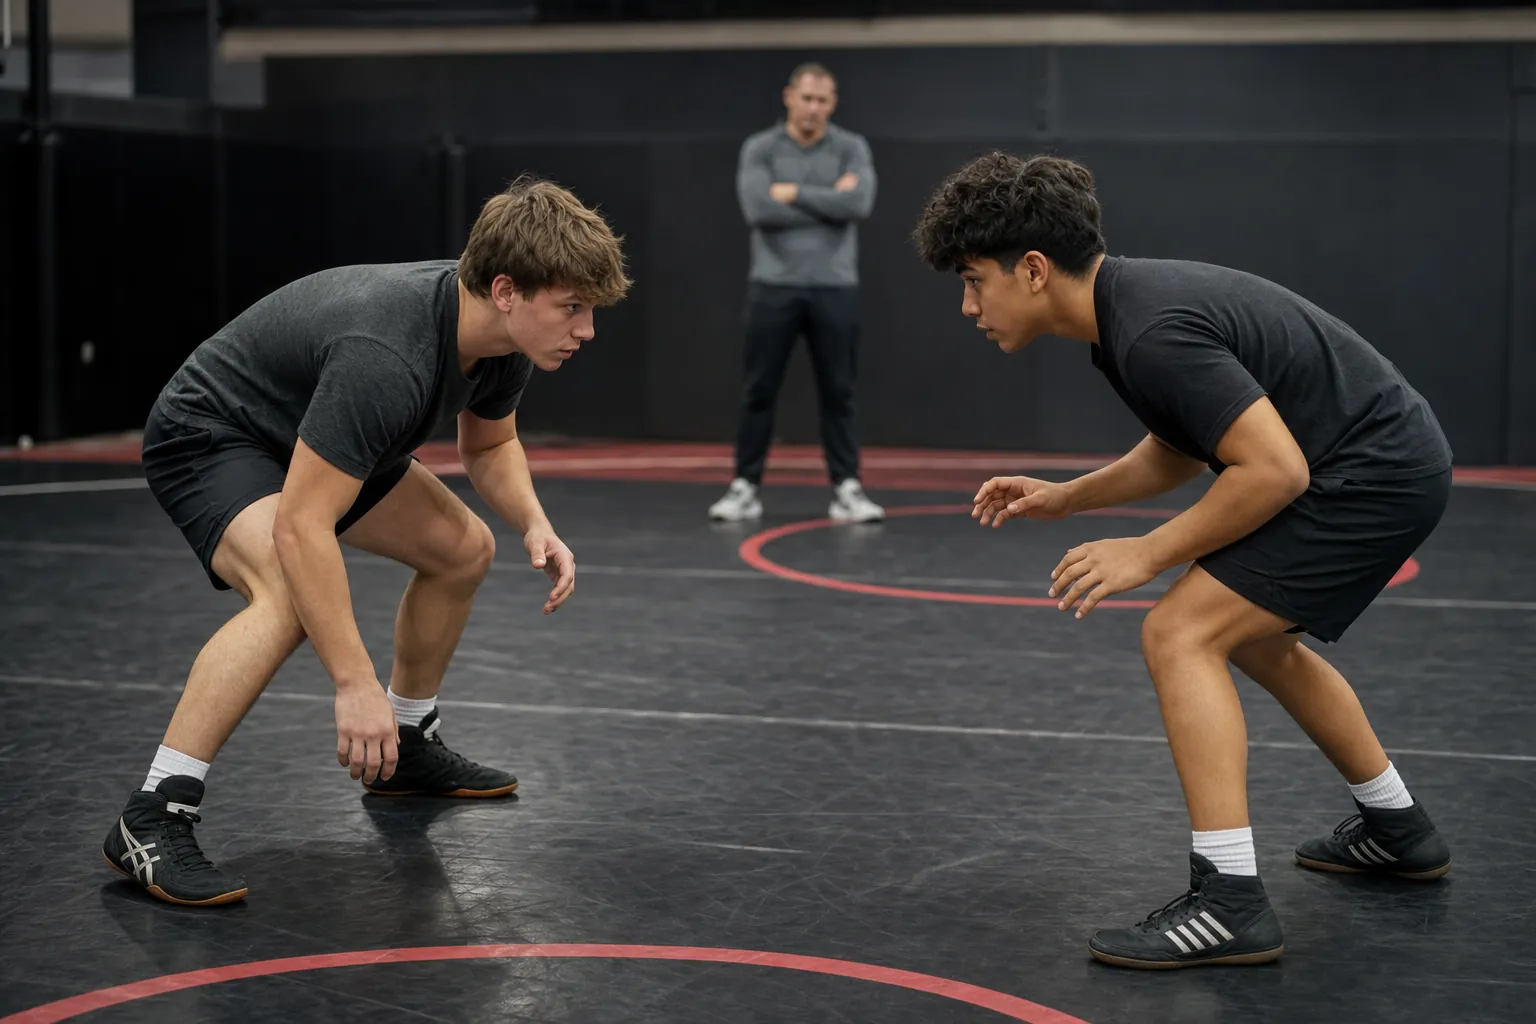
Good wrestling drills do not need to look complicated to matter. They need to give athletes a repeatable way to improve the movements that show up before, during and after every exchange: getting into stance, moving without crossing the feet, changing levels, creating an opening, getting to a leg and recovering position when the first look does not work.
That sounds basic because it is basic. The wrestlers who get better fastest are often the ones who can return to those details when practice gets fast. A drill is useful when it gives a clear job, enough repetitions to feel the correction and a level of resistance that matches the athlete’s experience. A drill becomes noise when everybody is moving hard but nobody knows what a clean repetition should look like.
Use this guide as a practice menu, not a script that replaces coaching. Your coach knows the team’s system, the athlete’s experience and which positions need attention next. These wrestling drills help turn that direction into purposeful repetitions, whether you are new to the sport, returning after a break or trying to tighten up the details before the season.
Start with a drill that has one clear job
Before setting a clock, name the action and the finish. “Get better at takedowns” is too broad. “Move in stance without crossing your feet, then touch the lead leg with your trail hand” is clear enough to coach. Athletes should know where their feet, hands, head and hips are supposed to finish before they add speed.
USA Wrestling’s core curriculum organizes fundamental skills from position and motion into attacks, defense and wrestling situations. That sequence is useful for practice too. Start with the position that makes the next skill possible. A clean stance gives a level change somewhere to go. A level change makes an entry more believable. An entry gives hand fighting a purpose beyond reaching for a collar tie.
For every drill below, use the same progression: show the position, rehearse it slowly, add a simple cue, then add speed or a partner only when the shape stays reliable. That approach is less flashy than a highlight-reel move, but it is how a movement becomes available when an opponent is trying to stop it.
1. Stance and motion: stay ready while you move
Stance and motion is where most useful wrestling begins. The athlete starts in a balanced stance, keeps the feet underneath the hips and moves in every direction without clicking the heels together or letting the upper body rise. The goal is to stay ready to attack, defend or clear a tie after the next step.
Start with a solo line drill. Mark a small square with tape, shoes or mat lines. Move forward, backward, left and right for 20 seconds, keeping the same lead leg in front. Reset for 20 seconds, then switch the lead leg. The feet should move first, one at a time, with no crossing. If the athlete gets tall, reaches with the hands or starts looking at the floor, slow it down.
Then turn it into a mirror drill. One wrestler leads and the partner stays at a safe distance, matching the movement without touching. Give the leader a simple job such as circling toward the open side, cutting the mat off or changing direction on a coach’s clap. This teaches athletes to move with a reason instead of bouncing in place.

2. Level changes: lower the hips without folding forward
A level change is not a bow. It is a controlled drop through the hips and knees while the chest stays proud enough to see the opponent. Wrestlers who fold at the waist often reach for legs with their head down, which makes the entry slower and easier to defend. A clean level change puts the athlete in position to step, penetrate or fake without giving away posture.
Use a simple touch drill. From stance, the wrestler changes levels and touches both hands to the outside of the knees, then returns to stance. Do five controlled reps, then repeat with the other lead leg. The cue is “eyes up, hips down, heels ready.” The athlete should feel the legs doing the work, not the lower back.
Next, pair the level change with a reaction. A partner points left or right, and the wrestler changes level before taking one short step in that direction. This is still not a takedown drill. It is a way to make the level change part of movement, so athletes do not freeze in front of an opponent before they attack.
3. Penetration steps: get to the leg in a strong shape
The penetration step turns a level change into a real entry. The lead knee travels toward the mat between the opponent’s feet, the trail leg drives behind it and the body stays connected enough to finish in a balanced position. The first few repetitions should be slow. Speed added to a bad knee position only makes a faster bad habit.
Start without a partner. From stance, take one penetration step, put the knee close to the mat, bring the trail foot up and finish with the hands in front of the body. Freeze for a second at the finish. Ask: is the head up, is the back knee safe and is the trail foot ready to drive? Five reps per side is enough to spot a useful correction.
Once the shape is solid, add a target such as a partner holding a pad or a light shoulder touch. The attacker does not need to blast through the partner. The job is to enter on a clean angle and finish in a position that could continue into a single or double leg. Athletes can use the more complete wrestling workout guide to build the leg and trunk strength that helps those positions hold up under pressure.

4. Hand fighting: win position before chasing a shot
Hand fighting is not just grabbing someone’s head and pulling. It is the work of creating a better angle, clearing their hands, controlling space and making the opponent react. A wrestler who can get to an inside tie, move an elbow or make an opponent step heavy can create a much cleaner attack than someone who shoots from too far away.
Use a light-contact inside-control drill. Two wrestlers start in stance, each trying to place both hands inside at the biceps or shoulders without grabbing or snapping. Work for 20 seconds, reset and repeat three times. The goal is not to win every round. The goal is to keep the feet moving while the hands return to a useful place.
Then add a simple clear-and-go. One wrestler begins with a collar tie. The other practices a coached clear, returns to stance and takes one controlled angle step. Rotate jobs. Keep the resistance low until both wrestlers understand where the clear ends and where the next movement begins. That gives the athlete a usable answer instead of the habit of standing in a tie and hoping a shot appears.

5. Put the pieces together with short situation drills
Once the individual parts look better, connect them in a small situation. A good situation drill limits the choices enough that athletes can recognize the opening, but leaves enough movement that the repetition feels like wrestling. Begin with a clear starting position and a clear finish. For example: one wrestler starts with inside control, the other starts with a collar tie, and the attacker has 20 seconds to clear, create an angle and touch the lead leg.
Another useful option is a front-headlock recovery drill. One wrestler begins in a safe front-headlock position with light pressure. The other wrestler works to keep a strong base, clear the hands, circle to daylight and return to stance. The goal is not to force a finish. It is to give athletes a repeatable way to recover their position before the situation gets worse.
Keep the resistance matched to the group. Beginners need cooperative reps first, then light resistance. More experienced wrestlers can start from a realistic tie or finish position, but they still need a limited job. When every drill becomes full live wrestling, athletes get more tired but often get fewer quality repetitions of the exact skill practice was meant to improve.
Use this 30-minute wrestling drill block
This simple block works as a starting point for a small group, a practice station or a home session with a qualified partner and safe mat space. It is not a substitute for your team plan. Use it when you want a short block that covers movement, entry and position without piling fatigue on top of the rest of practice.
Five minutes: stance and motion
Three 20-second solo rounds in each lead leg, then two 20-second mirror rounds. Focus on low hips, quiet feet and eyes forward.
Seven minutes: level changes and penetration steps
Five slow level changes per side, then five penetration steps per side. Add a pad or cooperative partner only after the finish position stays clean.
Eight minutes: hand fighting
Three 20-second inside-control rounds, followed by coached clear-and-angle repetitions. Keep contact controlled and feet active.
Seven minutes: one situation
Choose one starting tie or recovery position. Work 20 seconds, reset, then switch partners or roles. Give one correction between rounds.
Three minutes: recap
Have each athlete name one position that improved and one detail to bring into the next live round. The point is to carry a skill forward, not just finish the clock.
Coaches can make the block harder by shortening rest, adding a more active partner or moving into a live finish. Do that only after the basic movement holds together. Athletes who need more physical preparation around their mat work can pair this block with the wrestling conditioning guide, which explains how to add work without draining the next practice.
Do not let a drill turn into a bad habit
The most common mistake is starting too fast. A drill looks intense when athletes race through it, but intensity without a position to protect often teaches the wrong thing. Keep the first few reps deliberate. A wrestler should be able to stop at the finish and show where the feet, knees, hips, head and hands belong.
Another mistake is giving too many instructions at once. Pick one cue for the round. It might be “do not cross your feet,” “eyes up on the level change” or “clear the tie before you circle.” The next round can have a different cue. Trying to solve everything in one rep leaves athletes thinking instead of moving.
Finally, protect partners. Use real wrestling shoes or a safe training surface, keep contact appropriate to the drill and follow your coach’s rules. Stop if an athlete is hurt, dizzy or cannot control the movement. The right drill makes people better for tomorrow’s practice, not less available for it.
Keep a simple record of what carries into live wrestling
After a week or two, ask a better question than “Did we do enough drills?” Ask what changed in the live goes. Are athletes staying lower in their stance? Are they getting to a leg without reaching? Are they clearing a tie instead of freezing? The answer tells you whether the drill belongs in the next practice block or needs a different progression.
That is the standard behind Hands Raised: keep the work honest enough to show up when it counts. Build the details, repeat them with purpose and carry the habit past the mat. Browse the Combat Sports Hats collection, read the stories in Athlete Spotlight and spend time with our story when you want a reminder of the work behind the win.
Frequently asked questions
What are the best wrestling drills for beginners?
The best beginner drills teach a strong stance, simple movement, level changes, penetration steps, basic hand fighting and a safe finish position. Start slowly enough to own the shape of each movement, then add pace and a partner once those positions stay clean.
How long should wrestling drills last?
A focused drilling block can last 15 to 30 minutes. The goal is high-quality repetitions, not seeing how long athletes can stay tired. Change the pace or take a brief reset when a wrestler can no longer hit the positions the drill is meant to build.
Can you practice wrestling drills at home?
Yes, some drills work well at home: stance and motion, level changes, penetration steps without a partner, sprawls on a safe surface and shadow wrestling. Avoid throws, live takedowns and anything that needs a trained partner or proper mats.
How many repetitions should a wrestling drill have?
Use enough repetitions for an athlete to recognize the movement and make a small correction, then switch sides or change the look. A useful starting point is three short rounds of 20 to 30 seconds, or five to eight controlled repetitions per side.
Related posts
Wrestling training
Wrestling Workout: A Week That Supports Practice
A practical wrestling workout plan that builds strength, conditioning and recovery without taking away from mat time.
Read the guide →
Wrestling training
Wrestling Conditioning: Build a Gas Tank That Fits Practice
A practical wrestling conditioning plan built around hard efforts, real recovery and staying sharp when practice gets tough.
Read the guide →